For those of you who like to surf cellular networks on your iPad over the Wi-Fi variety, the Pad Air 2 and iPad mini 3 come with a special bonus: Apple's self-titled Apple SIM. The nano-SIM is identical to your typical iPad cellular SIM, with one key difference: It supports on-the-fly connections to multiple different cellular carriers.
That's right: You no longer have to decide before you buy your tablet which network you'd like to use it on, and can change it at any time. (Well, mostly. We'll explain in a sec.)
The Apple SIM and you
The Apple SIM supports three networks in the United States: AT&T, Sprint, and T-Mobile. (In the U.K., EE is Apple's sole launch partner.) Each has a variety of plans you can choose from, including ones that hook up to an already-existing phone contract, and you can cancel the pre-paid plans at any time and switch carriers.
Well, unless you choose AT&T. Once you pick AT&T as your carrier in the System Preferences selection screen, the Apple SIM is locked to that network; you'll have to get another Apple SIM if you want to cancel that plan and instead use T-Mobile or Sprint. (Likewise, once you sign up for either Sprint or T-Mobile, AT&T is taken off the table as a potential option.) For more information, check out Apple's support document on the matter.
And then there's Verizon. The carrier has decided it wants no part in the magic of the user-friendly Apple SIM; instead, if you'd like to use your iPad on Verizon, you'll either have to purchase your iPad directly from the carrier or an Apple Retail Store, or pick up a Verizon nano-SIM card for your already-purchased iPad Air 2.
Set up an Apple SIM
The initial cellular setup is as easy as it's ever been — except this time you have three carriers from which to choose from. Visit the Settings app, select the Cellular menu, and tap the Set Up Cellular Data button. From there, you can choose which carrier you'd like to sign up with.
In the United States, T-Mobile offers any cellular iPad users 200MB free a month; unless you have your heart set on using AT&T, it's a great plan to start off with before you choose a paid cellular plan.
I am a little sad that Apple hasn't been able to integrate Apple Pay into this selection screen, as I had to pull out my decidedly-now-old-fashioned wallet to enter in credit card information for my plan, but other than that, signing up is simple as can be.
Switch plans or carriers on the Apple SIM
Switching carriers and plans after you've set up your initial decision is also decidedly simple if you want to switch between any carrier that supports open switching (Sprint and T-Mobile).
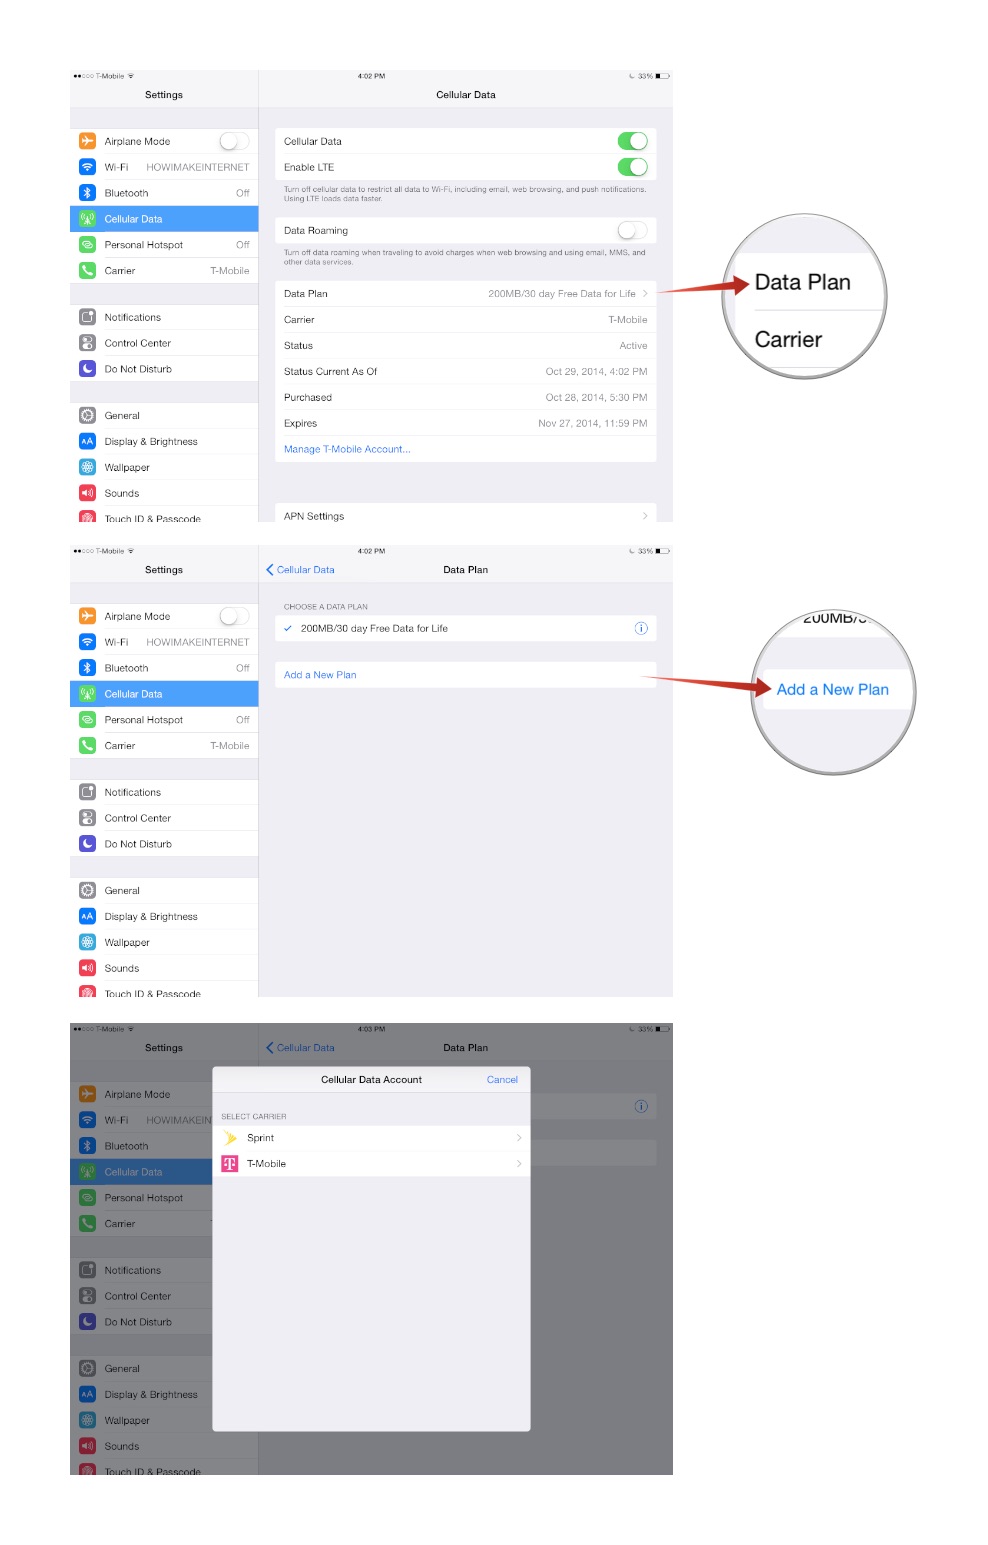
- Visit Settings > Cellular Data > Data Plan > Add a New Plan
- Select either Sprint or T-Mobile from the drop-down. (This is also where you can go to change your current carrier's data plan.)
- Choose which carrier and plan you'd like to add.
The first time you switch carriers, you'll have to re-enter your registration information to set up an account with the other carrier; any subsequent switches should only require your carrier username and password, however.
If you've had enough of T-Mobile or Sprint and want to switch to an AT&T or Verizon plan, you'll have to venture outside your iPad's Settings app and into your carrier retail store of choice; at the store, you can request a nano-SIM for the iPad Air 2. From there, use the SIM removal tool that came with your iPad to pop out the Apple SIM and insert your replacement.
Carrier switch-a-roo
As a longtime AT&T customer, I've actually been really excited to play with the Apple SIM—I haven't used T-Mobile's network in decades, and I've never tried Sprint before. It's a neat way to see coverage areas on a different network, and pick the best carrier based on my current location. What about you, folks? Is Apple's new SIM technology awesome or a feature you'll never use?

No comments:
Post a Comment